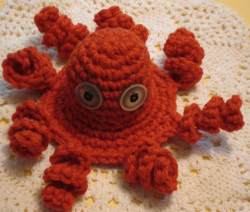
 Amitopis is the my new little friend and my latest free crochet pattern. This little Crochet Amigurumi Octopus is simple and easy to make. It only uses one color of yarn and the chain and single crochet stitches.
There are two versions of this crochet amigurumi octopus – stuffed and unstuffed.
I used buttons for eyes you might want to crochet or embroider your eyes.
This amigurumi project is also a great stash-buster as it takes only a small amount of yarn to make. So without further adieu, let’s get started.
Amitopus Supplies & Materials List
Small amount of yarn. (I used 4-ply acrylic yarn.)
Crochet needle, one size smaller than what is recommended by yarn manufacturer. (This helps to keep the stuffing from showing.)
Two buttons.
Black embroidery floss.
Stuffing. (I used plain fiberfill without any added weight.)
Free Crochet Amigurumi Octopus Pattern
All rows are made without joining in the true crochet Amigurumi style.
Row 1: Crochet a 6 stitch circle using the magic circle or other technique but do not join the first and last stitches.
Row 2: Starting in the first stitch of your ring, work 2 single crochet in each stitch around the ring for a total of 12 stitches.
Row 3: Continuing to work around the ring, crochet 1 sc in the odd stitches and 2 sc in the even stitches of the previous row. (18)
Row 4: 1sc around (18)
Row 5: 1 sc around with 2sc in the 3rd, 6th, 9th, 12th, 15th and 18th stitches (24)
Row 6: 1 sc around (24)
Row 7: 1sc around but make decreases in the 8th, 16th, and 23rd stitches (21)
Row 8: 1 sc around but make decreases in the 4th, 12th and 18th stitches (18)
Row 9: 1 sc around (18)
Row 10: 1 sc around (18)
Row 11: 1sc in odd stitches and 2sc in each of the even stitches (27)
Row12: 1sc around with increases in the 1st, 6th, 11th, 16th and 21st stitches (32)
Row 13: 4 sc around, ch 12, turn, crochet 2sc in 1st stitch from the hook, 3sc in the 2nd stitch from the hook alternating 2 and 3 stitches in each of the chains, single crochet back into the stitch where you originated the chain. Repeat this sequence around your Amitopus until you have the prerequisite 8 legs.
End off. I worked the end up to the top of the head and tied a knot with the tail from the original 6-stitch ring.
Crochet Amigurumi Octopus Button Eyes
Sew on a pair of 4-hole buttons using 3 strands of black embroidery floss.
Sew the buttons on forming a square with your stitches to make the iris of the eye of your amigurumi octopus. On the backside, vary your stitches to provide maximum hold. Be sure to make an even amount of stitches on each side of your square and try to limit splitting the threads. Don’t worry about neatness on the “inside” because the stitches on the back side will be hidden.
I used both longer and shorter needles and found the shorter needle was a bit easier. Looking back, it might be easier to sew the eyes on before making the row that creates the tentacles/legs. Use whichever technique works best for you. Be careful as chances are good that you will stick yourself at least once; so be prepared for that. (I stuck myself with both needles but I found the shorter needle was much easier and quicker to use.)
For a different look, you might want to crochet two small circles, use two beads or two pieces of felt for your eyes.
To stuff or not to stuff your Amigurumi Octopus
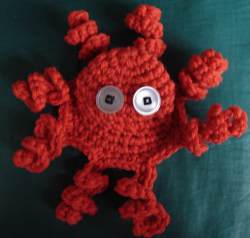 As I began sewing on my Amitopus’ eyes, I thought he looked quite cute with his head kinda squished and hollow.
If you have seen a live octopus in motion, their body seems almost hollow as it moves along in the water.
I would recommend waiting until the eyes are on to decide whether or not you want to stuff your amigurumi.
For those of you who wish to stuff your new crochet pet, those instructions follow.
Stuffed crochet amigurumi octopus pattern
You will have to create a plug of sorts for the bottom of your critter to hold the stuffing in.
Make 2 circles as follows:
Row 1: 6 stitch circle
Row 2: 2 sc in each stitch around (12)
Row 3: 2 sc in each stitch around (24)
Leave exceptionally long tails on both circles, mine were about 24 inches long.
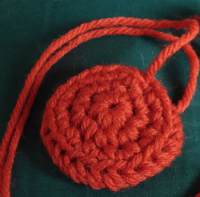 Place the crochet circles back to back and slightly skewed. The idea is to ensure that the gaps in your stitches do not overlap making a place for the stuffing to escape or be noticeable.
Take one of the long ends and pull it through 3 of the loops of the four on the edge of the pair of crochet circles. The way I found this to be a bit easier was to insert my hook into the back loop of the circle edge on top and through both loops on the second circle. Weave the tail all the way around your circle pair creating something that looks like the picture. It should look roughly like one of those creme filled cookies after you twist off the top cookie.
By using the two circle sandwich and joining it only using three of the loops, you will have a stronger base and one that will fit more flatly into the bottom.
Using the long tails from your circles, attach the base/plug to your Amitopus by weaving the yarn with a crochet hook through those stitches you did not use (the cream of the cookie) when joining the circles and the body of your octopus. The first few stitches will be cumbersome and tricky to maneuver but it’s worth the fussiness to make your crochet octopus sit nicely on a flat surface.
Please let me know what you think of this pattern and I’d love to include pictures of your Amigurumi octopus in this post.


Cute stuff. My kids are going to love them.