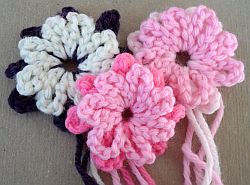
This crochet flower pattern creates flowers that remind me a bit of morning glories with their pretty radiating stripes in the center. As you can see with my three crochet flowers, the bigger the contrast between the yarn colors, the more you’ll see the striping.
Using a variation of the magic ring technique, this quick and easy, stash-busting crochet flower pattern is so much fun to make.
These crochet flowers are actually made by stitching on the back side. When you’re all done, simply flip the flower over to reveal the pretty side.
And yes, I always leave the tails on until I know what I am going to do with my crochet flowers.
If anyone’s counting, the pink flower in the foreground has fewer petals. That’s what makes this pattern such a great stash-buster – if you run out of yarn while making the inner flower, just make fewer petals.
Crochet Flower Pattern Layer 1 – Inner Flower
1. Using the ring technique, instead of making a base row, we’re going to work right on the ring itself. Make the initial anchoring stitch onto the ring and then chain 8. Slip stitch onto the ring and chain 8 – continue making chain 8 loops until you have the 8 petals of the inner flower.
2. At this point you can tighten your ring and finish off. However, to get a better looking result where the second color starbursts in the middle, pull the ring just enough to keep it’s shape and wait until you finish the second/outer flower before pulling the ring tight and tying it off.
Crochet Flower Pattern Layer 2 – Outer Flower
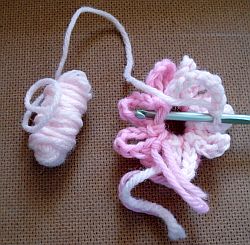
 1. Using a contrasting color, start by making a slip stitch onto the ring in the center of the first petal – insert the hook into the middle of the ring and come up in the middle of the chain 8 loop – make sure the stitch is actually made on the magic loop rather than on top of the inner petal – see the picture on the right. (You can start anywhere on the ring but I like starting at the beginning of the inner flower so that all of the tails end up in the same place.)
2. Chain 9 and slip stitch into the center of the next inner flower petal, again making sure you are making your stitch around the ring rather than over the inner flower’s stitch – this is why it’s easier to not tie off the magic ring before you finish the outer row. Continue making your way around the flower making chain 9 loops.
3. Slip stitch the 8th loop around the stem of the first stitch from the inner flower right next to the first slip stitch of the outer flower. The idea is to make it look like the loop is going into the first stitch of the outer flower without it showing through to the front.
4. Weave the inner color tails to the top/back of the flower and tie together to both secure the ring and the last petal. Tie the tails of the outer petal together as well. Weave in the ends or use to attach your flower to a garment, purse or other item.
This crochet flower pattern also works well for different weight yarns. Just make sure that the first set of petals is slightly shorter than the second.


Hi Sorry I did not ask permission to use the patterns for the flowers. Making beanies for my grandaughter. Bette
Thank you so much for the free pattern.
It is so cute. The directions were simple
and easy to follow. Again thanks.