I have been seeing these clever ornaments both online and off and figured they must have a name. They do. They are called Polish Stars or Polish Porcupines. They are wicked easy and cheap to make but they are a bit tedious and time-consuming. The good news is that they don’t have to be perfect to look good and make a great TV project.
You’ll need: paper, scissors, glue, small pieces of felt or beads, embroidery needle, and strong string or yarn
Polish Star Ornaments Instructions

Cut 10-14 circles measuring around 2 inches in diameter. A large can of tomato sauce was a good size – check your pantry and you’ll probably have something similar. Or, you can use one of these clever little Safety Compass. Used them in high school geometry class and I think every crafter should have one in their stash. I was able to just barely get five circles on a piece of copy paper. To save cutting time, draw the circles on one piece of paper, stack a sheet or two of paper underneath and cut them both at the same time.
Fold a circle in half. In half again. And in half once more. Unfold the circle. The fold lines will become your cutting lines. Don’t worry if your folds aren’t exactly precise – it doesn’t matter with this project.

Center something circular that’s about an inch in circumference on your cut circle and trace a circle in the center. My favorite circle drawing tool is a Helix Angle and Circle Maker (36002). I use it all the time for drawing small circles.
Cut along the fold lines up to the circle you just drew to create “petals” or star points. Precision cutting isn’t required. Just don’t cut through the inner circle guide. Save time by cutting several circles at the same time.
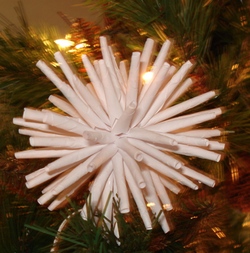
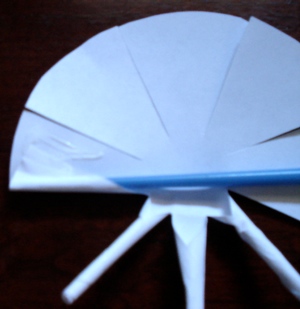 To make a more porcupine-like star, I used the end of one of those cheapo paintbrushes. Place the brush end along the center of one of the petals. Snugly fold over one of the tips, as shown. Then twirl the entire circle around the brush to create the curled tip. (Be careful when making smaller twirls. If you make them too tight, the paper can rip.)
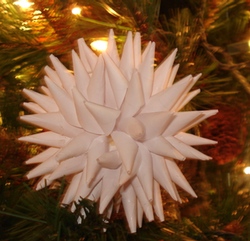
To make a more traditional looking Polish star, use a sharpened pencil to create the star points.
Several of the sites where I found tutorials on making Polish star ornaments somewhat glossed over the issue of glue. School glue did not work as well as tacky glue for me. Also, most showed only using a little dab of glue at the corner. I found the edges did not stay sealed that way. I ended up smearing a thin line of glue slightly in from the edges. As you work through these, you’ll get a feel for how much glue to use.
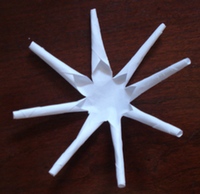 After you twirl each petal, you should end up with something similar to this.
If you work with felt, you probably have a stash somewhere of all the little bits and pieces that you just couldn’t bring yourself to throw out. Find your stash…I’ve found a use for some of the smallest bits you might have in your crafting stash.
 Cut out a tiny circle-like piece of felt (shape doesn’t matter but use something close in color to your paper otherwise it might show). You could also use a bead but I think the felt bends better to create the star shape, adds less weight and is essentially free since you’ll be using scrap pieces.
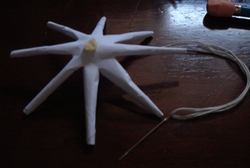
Stitch through the felt and position it mid-way down the length of your string. Unthread the needle and re-thread it using both ends of the thread. Stitch through the middle of one of the circles, as shown (the ‘back’ side should be facing up).
 Stitch through and stack the other circles. Position them so that the petals of one fall in between the petals of the previous one with the ‘back’ sides facing down. Once you’ve stacked the last circle, string another small piece of felt.
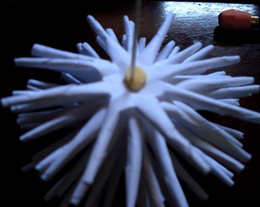
Unthread the needle and tie a knot with the two ends of thread over the felt. The idea is to pull it tightly so as to pack each of the circles together and create the globe-like shape. In a way, the concept is quite similar to making a pom-pom.
A Word on Paper Choice
I think these come out lovely just using simple copy paper. There is a veritable rainbow of colors available. It’s also the cheapest option. You could easily add a little bling by dipping the points in glitter before assembly.
Scrapbook paper seems to work well too and creates more colorful Polish stars. Mulberry seems to also be a pretty choice but is definitely a more expensive one.
One crafter mentioned using wrapping paper to make Polish stars. I admit that I didn’t try it. It seems like it would rip way too easily and you would have to be more gentle when making the points and assembling the finished star.
The problem I see with using patterned paper is that if it isn’t printed on both sides, you might have shocks of white throughout your star. I can see the insides of the points on the more traditional Polish star that I made. I would think it would be very noticeable if you used wrapping paper.
Polish Star Gallery
Here are the two I made hung on our Christmas tree. They were both made using 10 layers. If I make another one of the more traditional Polish stars with copy paper, I might try it with only 9 layers. It seems like with 10 layers, the points kind of squish each other a bit and make for a slightly uneven surface.


love it
Love the idea