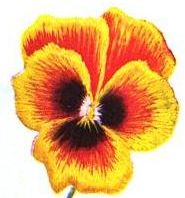
 Ever wonder how they embroidered that sweet little satin purse or Oriental-inspired blouse of yours? To the trained eye, it’s obviously a form of satin stitch. But, how are the beautiful shadings of color, like the pansy to the left, actually laid down on fabric? Today, much of this type of work is now being done by machine in the form of machine embroidery. But, for those of us who still wish to embroider by hand, this embroidery tutorial should explain how such fine work is done.
This tutorial comes from a vintage lady’s magazine. Rather than rewrite the instructions, I’ve simply included the original words and the original diagrams. In some later posts, I’ll include some patterns that utilize this technique that you can use to embroider like the professionals and create your own dazzling pieces.
Long and Short Satin Stitches
The first group of stitches includes the simple elements by means of which the greater part of the magnificent embroideries of the Renaissance were executed. As they are the constituent parts of the most elaborate work which has been done or can be done, so they should be elements of our most simple work on linens.
It is a mistake to work too heavily on linen. Heavy or dark colored embroidery on white linen is sure to look clear cut and hard unless handled very skillfully. Therefore the simple long and short border embroidery is the most suitable.
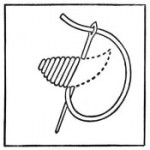
1a. – Simple Long and Short Stitch. The stitch is well described by its name. The method is one long and one alternate short stitch laid side by side on the surface. These stitches should be commenced on the outline of the design which they are intended to define and carried through the ground material within the form. The points of especial care in this work should be to make the outline perfectly true and unbroken, and to see to it that the stitches laid side by side form a smooth surface. In order to succeed in the first essential, the needle must be brought up every time in exactly the right place, which is a shade beyond the stamped line. If the stitches are taken through the stamped line itself or a shade within it the stamping will show. Nothing could be more undesirable than this.
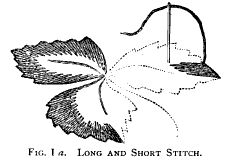 While every other stitch should be long and every other one should be short, all the long stitches should not be the same length, nor all the short ones. They should vary in themselves so that the inside edge — corresponding to the outside, which is the outline — will present a pleasing variety. Work thus laid also takes the light prettily because of the variety in length.
The length of the stitches must be determined by the size of the form they are to border. When the forms are very small they are likely to cover the larger part of it; if they are from one to three inches about one-third will be covered. This rule must, however, be held in a very tentative way indeed, as the possible variety of form suggests so many exceptions as to make it almost impossible to make a definite statement as to the length of stitches. A proper proportion to the size of the form should be the guide, with the reassuring fact in mind that if the stitches are correctly placed they may be from 3/4 of an inch to an inch long and still lie well. A form which presents an unbroken surface of more than three inches will need at least one more series of long and short stitches after the method of feather stitch.
While this work is sufficient in itself, it leaves something to the imagination in its application to forms and has therefore inherent in it a very important artistic principle. The illustration shows clearly the method of the long and short stitch. See Fig. I a.
Another most important requirement, aside from placing this stitch with a good outline and so that it shall present a smooth surface, is that it shall take the proper direction in the forms it is intended to express. A very valuable article on “Stitch Direction” will be published in our next number.
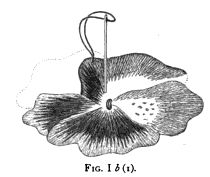 I b. — Feather Stitch, or Opus Plumarium. The work already described (the Long and Short Stitch) is the first step in this, the most beautiful of embroidery. When the long and short work has been carried around a form, or over one section of it, lay over this row another series of stitches long and short, placed exactly in the same direction as the first and covering the first about two-thirds its width. See Fig. I b (1).
It will seem to the amateur an extravagance of time and material to cover these rows so fully one over the other, but it is just this point which is the way to beauty in the work; it raises the surface slightly and makes it very rich. Besides, one row blends with the next because the alternating long and short stitches of the over row allow very little of the preceding to show. They appear only because of the difference in length of the upper edge of the covering row. Commence the first stitch of the second layer by bringing up the needle about one-sixteenth of an inch below the first stitch of the first row, between it and the second stitch of the first row, send it down about one-fourth inch below the finish of the first stitch of the first row. Take the next stitch, which will be a short one, in the same way in regard to its relation to the first row. Continue these stitches, thus forming a second row over the first, covering it at least two-thirds its length. 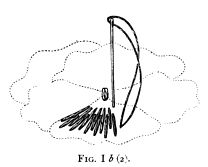 The first row is of course perfectly even on its upper edge, that is, it coincides with the Fig. stamped outline, but the second row is necessarily long and short on both edges, as it is worked over the first.
Fig. I b (2) shows this second row in detail, unrelated to the first. This illustration will make plain what is meant by long and short on both edges. In this way one shade is made to blend into the next, not gradually so that the stitches are invisible, but in such a way as to produce a strong and clear effect. 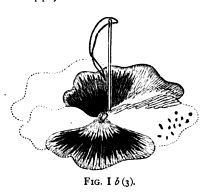
This is embroidery and not an imitation of painting. It is securing an effect in a conventional way, which is the only legitimate method to apply to a conventional art. Continue these rows until they cover the form ; the length of the stitches should be determined by the size of the form to be embroidered.
The last row must of course conform to the design as it is finished off, as must all stitches wherever they come in contact with the outline. See Fig. I b (3).
Even though I now use my embroidery machine to embellish my projects I still love the look of Hand embroidery. And I always have a small piece on the go beside my chair.
The embroidery that can be done by machines available to the general consumer is truly amazing. The only flaw I see with it is that it is easily recognized as machine work rather than hand done. Glad to see that I’m not the only one who favors hand embroidery over machine work.
I would also like to say that anything hand embroidered is far more endearing that anything by machine. It takes the heart and soul of an individual who pours hours over work to be considered an artist where anyone else who is doing it by machine, only wishes they were.
I admit that there is truly something special about hand embroidery. Every stitch; insert the needle, pull the thread; one by one; covering the surface of the fabric. I have a sewing machine, but I tend to get more satisfaction out of making the stitches myself. That said, there are some absolutely fabulous artists using free motion machine embroidery to essentially paint with thread. Those folks have master drawing and painting skills but instead of brushes and pens, they use their sewing machines. They don’t rely on a computer ‘drawing’ the stitches for them. They control where every single stitch is placed. It’s fascinating to watch them work. Thanks for stopping by and taking the time to comment.