I purchased a book about making felt projects at a bookstore a few weeks ago. A big deal in my world. I rarely splurge on craft books anymore; there’s so much great stuff online.
It has an introductory section covering the types of felt, some basic embroidery stitches and talks about sewing in general. Then they listed items they considered a “basic sewing kit”. Now maybe it’s just me, but if someone uses the word basic, I equate that to what beginner’s would keep on hand. It would also be the sort of materials that a non-crafty household might have. Meaning it would include the basics, only.
Item number one on their list is a sewing machine. An average sewing machine can easily cost several hundred dollars. I’ve made a number of felt projects and never have I needed my sewing machine. I own one and know how to use it but it would never be something I would consider a basic item – particularly for making felt appliqué and stuffed felt items.
Going down the top 5 items in their list, we also have scissors, pinking shears, rotary cutting tools (optional) and straight pins. Pinking shears as part of a basic sewing kit? Sure if you are going to be making clothing and working with certain types of fabrics pinking shears might be useful but if you already have a sewing machine, most people just use a jig-zag stitch to get the same effect. Pinking shears can add a nice scalloped sort of edge to a felt project but they can be pricy and even experienced sewers complain about how fussy they can be to use.
And, one final note, the book’s 13 item basic sewing kit is missing the most important item…thread.
So, now that I’ve picked apart the book’s list, I thought I would share mine.
Assembling A Basic Sewing Kit
A Truly Basic Sewing Kit
I would suggest there are two kinds of basic sewing kits…basic home use and beginning crafters. A basic home use kit would probably look something like the kit below. It has a variety of threads and needles. This kit is nice because it comes with buttons, snaps, safety pins and a lot of other bits and pieces that most sewers would have in their stash. According to the reviews, the scissors are even fairly nice.
Do keep in mind, that these kits cost in the neighborhood of what you would pay for a good quality scissors. They are really designed for not much more than re-attaching lost buttons or a quick fix to a ripped hem or seam. This kit contains a nail clippers too. If the kit you have doesn’t have them already, you might be better off replacing the scissors with a nail clippers – they’re still small and often will cut the thread more cleanly.
Basic Sewing Kit for Working With Felt
I asked Mom what she thought a basic sewing kit included and her answer was simple…needles, thread and a good scissor.
I tend to agree. Sewing machines, pinking shears and rotary cutters (and mats) are items that go far beyond what you really need to get started and for basic sewing with felt. You can always add those items later. My suggestion would be to decide if you even like sewing first before laying out money for them.
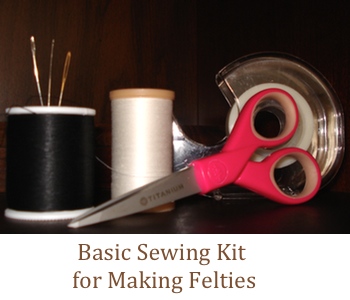
So here’s what I would include were I building a basic sewing kit for felties…
1. Thread
Thread; Felties are a bit different in some ways from other sewing projects. The stitching is often done on the outside and utilizing threads that offer high contrast are often preferred. Embroidery floss is, in my opinion, the best way to go. You can pick up single skeins for between 25 cents and 60 cents (depending on brand and sales) one color at a time. Or, you can opt for an assortment that brings the per-skein costs considerably lower. For years, DMC Embroidery floss has been the most popular choice; but, I’ve found there’s just not that much difference between the name brands and the no-name brand flosses.
For big projects where you’ll need more than a skein of the same thread – DMC is your best choice. (If you absolutely want to use DMC, my suggestion is to go local with coupons, it can be pricy.) Amazon practically has a price war for floss assortments going on. You can get an amazing amount of colors for around $10.
Oh, and those little baggies? They’re great for storing the floss. Skip those little flat cards. They can create creases in your thread that can make the thread extremely difficult to manage. Trust me on that one.
If all you have is sewing thread; it works fine for sewing felties. Just use as many strands of sewing thread as you would if using embroidery floss.
2. Sewing Needles
A set of good quality sewing needles. Those needles in the dial a needle style plastic containers can be snagged sometimes for around a dollar or so. They offer a nice variety of sizes but some of them have really lousy needles. The eyes are cut so poorly that they actually damage or even cut the thread. Spend a little more and get some nice needles. Clover offers a nice set of 16 gold eye needles. It includes several different sizes which work well for a single strand of sewing thread up to all 6 strands of embroidery floss.
3. Scissors for cutting felt.
A good pair of scissors can sometimes be hard to find. Brands that were once known for superior quality (and had the prices to match) seem to be slipping and sometimes a no-name cheapo can become the pair you guard as if they were made of solid gold.
I have a couple of favorites.
The first are by Wescott – Titanium Pointed Scissors. What makes them special is that tip. It’s super tiny and gets into tiny corners wonderfully. That tip is not child or pet friendly. It is like having a pin on a pair of scissors.
Titanium is quite non-stick. The transparent tape I often use with felt doesn’t stick to it which can help limit frustration – sometimes that stuff sticks everywhere but where it’s supposed to.
4. Scissors for Embroidering & Stitching
I would recommend a second pair of scissors for the beginning sewer and felt lover. The Westcotts are great but that microtip makes them a little risky when it comes to trimming threads on your feltie.
My second favorite is actually two pairs – Beadative Detail Scissors – a set with a straight blade and a curved blade. I have to admit, when I opened the box and saw scissors with a clear plastic handle, I thought I had been tricked. They looked and felt like some cheap junk. Boy, was I wrong. Both scissors cut very well. The protective covers snap on nicely to protect both the scissors and anyone handling them. They’re great for traveling!
I would recommend getting a pair of good quality manicure or embroidery scissors. I’ll admit that finding a great pair of small scissors has been a bit of trial and error for us. Some cuticle scissors migrated to our sewing room and others have been picked up at yard sales. My favorite is only marked “Made in England”, so I have no idea where to get another one. If I were buying another pair, I might try these – Stainless Steel Manicure Scissor.
5. Transparent Tape
In my beginner’s kit for working with felties, my favorite tool for working with patterns is transparent tape. Yep, the same tape you wrap presents with. Just tape the pattern pieces to the felt and cut. No tracing the pattern onto the fabric. Forget, playing around with pinning; just tape the pre-cut pattern piece down and snip away. Makes it easier to put pattern pieces closer together to maximize your felt pieces.
Hopefully, you’ve already got some tape anyway. But, if you need to buy some; my recommendation is to hit your local 100 pennies store or if you have them Dollar General. At Christmastime, our local Joann’s was selling 3 rolls for $6. The discount stores often have it for 50 cents to $1 per roll.
Money Saving Tips
I try to buy the best materials and equipment I can, within reason. I try to find things that can serve multiple functions and I’m always on the hunt for bargains. Here’s just a few tips on saving money when assembling your basic sewing kit.
Tip 1: Sewing needles can substitute for straight pins.
Tip 2: Unless you plan on sewing quilts or clothing, a seam ripper is generally overkill. A pointy scissor will get under threads and open them up just as easily. A large-eye needle also works great for removing stitches made by hand.
Tip 3: Leave the arts and crafts department. Cuticle scissors can work better than embroidery scissors. Fishing tackle boxes work great for storing beads, thread, needles and other small sewing items. The toy department can also be a goldmine, particularly after Christmas when craft project kits go on sale. Holiday clearance piles can be a great place to pick up buttons, beads, pipe cleaners and other items. Head over to the office supplies or household storage department to pick up a plastic container to hold your basic sewing kit and any works in progress.
Tip 4: Need wire? Check out the hardware department. You might be able to get the same gauge and quality of wire at a much cheaper price per foot. Same goes for string or twine. Thrift stores might also be a good place to pick wire.
Tip 5: Shop your local version of the 100 pennies stores first. They will often have the very same things your craft stores do for only a dollar. It might be last year’s packaging, but do you really care if that colored thread has 20 spools instead of 24 when you are getting it for a fraction of the original price? My favorite 100 pennies store even gets stuff from Oriental Trading that originally cost $6-10.
Final Thoughts
My best advice is start slow. It is so darn easy to get excited and go crazy. A sewing machine to make a single pair of felted baby booties is a bad investment. Of course, if you plan on going into the baby bootie business, then it makes sense to invest several hundred dollars on a machine.
If you haven’t worked with felt or sewn before, head off to a local shop and buy 2 or three pieces of different colored felt, matching DMC floss and some sewing needles. For $5 or so, you should be able to get plenty of supplies to make something super cute with.
But, I will warn you; making felties can quickly become addictive.
