Pinterest is one of the best places online to find inspiration. It sadly has become a place full of orphaned and purloined works. And, once one of those pieces goes somewhat viral, it becomes even more difficult to find the original source. So, with heartfelt apologies to the original designer of this lace crochet Christmas Bird ornament pattern, I thought I would share it with you and add my thoughts, suggestions and my own smaller version.
The pattern was designed by what appears to be a Japanese designer for thread crochet. It has been making the rounds among Russian, Ukrainian, and Czechoslovakian crocheters. A Russian crocheter has offered a suggested change (shown in red).
I was looking for a gift idea for Christmas. And, since I’m getting known as the crochet bird lady… I thought a lace crochet bird Christmas ornament was an awesome alternative to lace crochet snowflakes.
Here’s the stitch diagram with the change…
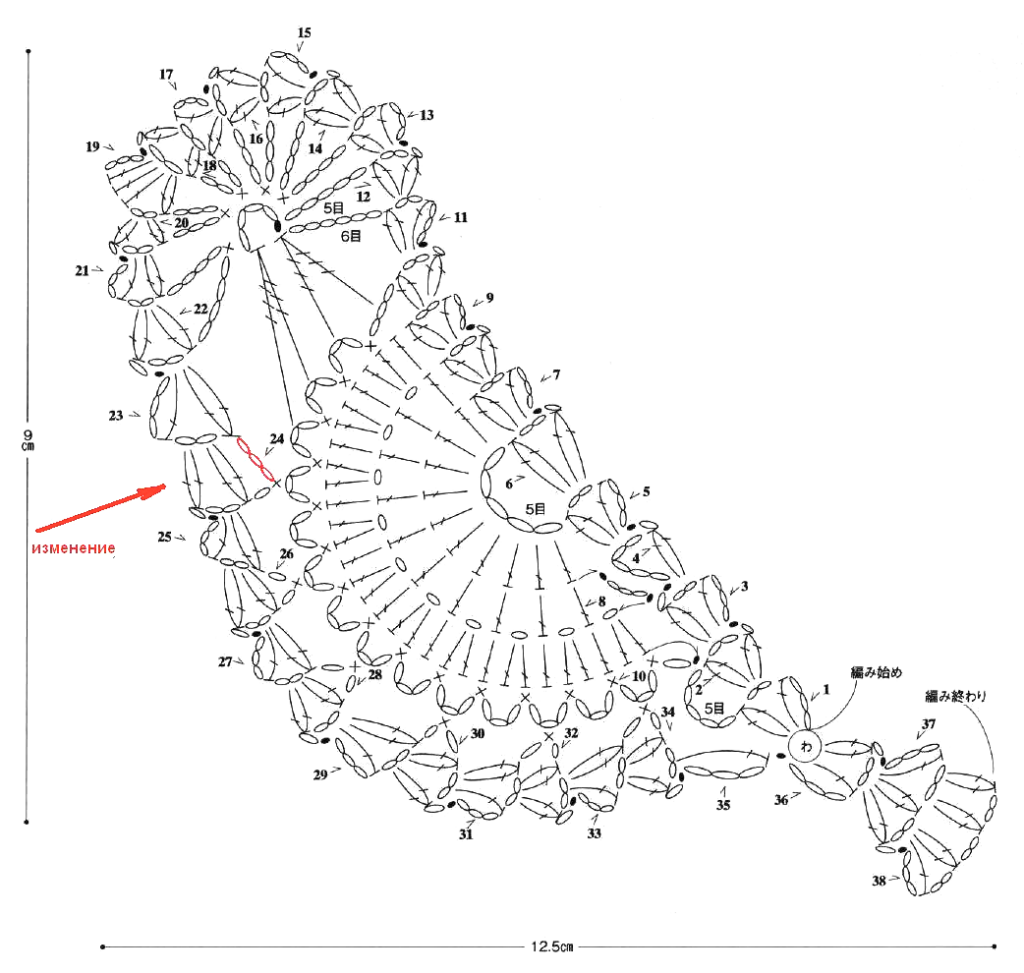
I have to admit when I first looked at this pattern, it looked more than a little confusing. It is a bit fiddly and can be unforgiving if you make a mistake. But, with a little practice it’s not as hard as it looks. The bird is basically encased by a ribbon of wheat stitch with 2dctog + chain 2 + 2dctog.
Technically, there are 38 rows. But, some are only a chain, a slip stitch, pair of 2 double crochet together and 2 chains.
To give you an idea of how it’s worked – you start at the base of the tail, work half-way up the back, make the belly and the upper back at the same time, work up over and around the head, back down the belly side and finish at the tip of the tail.
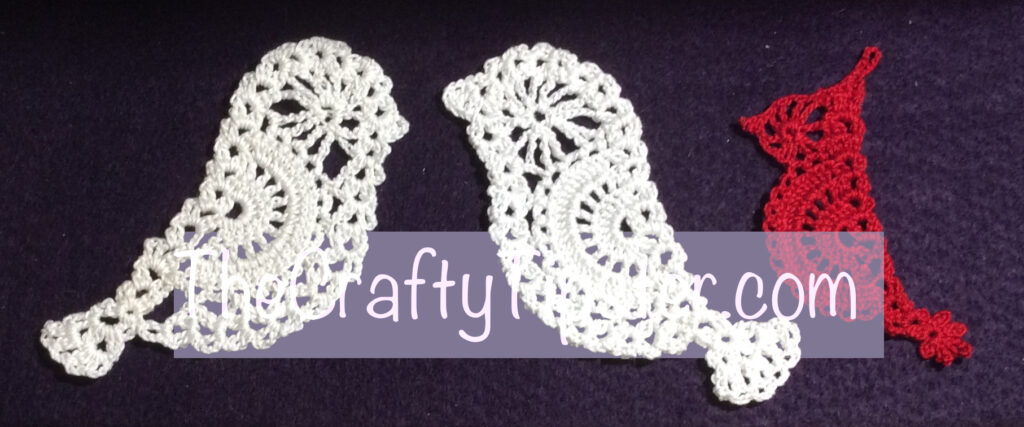
The photo below shows my first time trying the pattern. There’s a mistake in it somewhere. I know it’s there but haven’t spotted it. It lays flat, looks great, so it’s staying. Though, I have to admit, the center eye area is a more than a little bit messy.
Ironically, the 2nd, 3rd and 4th tries didn’t go as well. Oh, the perils of over-confidence and not bothering to count my stitches. So, the 2nd white bird is probably my 5th or 6th go from the original with a slightly bigger beak and fancier tail.
Michele’s Suggested Changes to the Original Crocheted Bird
Where it’s Easy to Go Wrong
While not really truly difficult, it’s a little mean. There are a few places where if you do it wrong, you won’t notice until several steps later.
The first thing is I would strongly urge you to go old school and make a chain 5 ring rather than using a magic circle. You will be working the first row and the 36th into the ring. It’s just easier to make a chain 5 ring as the original designer does.
Make absolutely sure with rows 7 and 8 you have 10 double crochets across the belly. You’ll need 30 double crochet stitches in the belly section of row 9. And, if you don’t make 14 chain 3 scallops in row 10, you will be most unhappy when you reach row 33. (Been there done that, sadly more than once.)
And, as you can see from my first attempt, if you do not keep the loops snug on your hook when you are making the chains and trebles in row 11, your eye will not be a nice round circle.
Bigger Beak
The beak is made during row 19. It’s subtle. I thought it was a little too subtle.
The original pattern was ch1, turn, slip, ch3, 3 dc, ch2, 2dctog…
I changed it to, ch4, turn, tr in middle of 2dctog of previous row, over chain 2 (tr, 2dc), then ch2 and 2dctog.
Closing the Gap in the Neck
If you look at the first bird and my second one, you might notice the first has a big gap in the chin area. I thought it could be made smaller and improve the look of the face.
My change is fairly simple. When working the chains between rows 21 and 22, finish the chain 4 from the eye, make 1 dctog, chain 1, turn, make dc into scallop with the 4th tr from row 11 (it’s the last scallop that has something hooked into it), turn, chain 2, 2dctog to finish row. It’s a bit fiddly and you might need a chain one after the added dc – but it will make more sense when you actually do it.
Closing the Gap at the Tail
Again, I thought the original pattern created a bit of a gap that wasn’t necessary.
I haven’t made too many more white ones and what follows are my notes. Hopefully they’re clear enough for you to work it out…
Replace original row 35… ch1, turn, slip (just like other rows), ch1, slip into opening in row 1 between pairs of 2dctog, 2 slips along dc of row 1, slip into ch5 ring, chain 3+dc_ch2, (2dctog+ch2+2dctog)X2.
The general idea is that you’re stuffing an extra wheat stitch into that space.
Changing the Tail of your Lace Crochet Christmas Bird
Once you finish row 35, you’re back at the starting chain 5 ring. At this point, you could go as fancy or bold as you would like. I will warn you, unless you plan on turning your bird into a peacock, less is more.
My biggest suggestion would be to make chain 3 scallops across the bottom to mimic all of the edges created by the wheat stitches and mimic the pretty scallops across the belly.
I’ll leave it to you to keep to the original pattern or make more changes.
Lace Crochet Cardinals
When I was playing with the original pattern, every time I finished the 10th row (the scallops across the belly), I kept thinking it was so pretty and got a little lost in the finished bird. So, I began thinking how could I take away a bit of the roundness on the back of the bird’s head and eliminate all of the wheat stitches around the head and down the belly to the tail.
Issue 1: If I don’t go back down the belly, I’ll need to do the tail first. Not a bad idea overall and might be helpful if following the original pattern.
Solution: To make a simple loop-based tail, like the one on my red cardinal – Use a magic ring, make a chain 5 loop, chain 7 loop, chain 9 loop, chain 7 loop and chain 5 loop before making row 1 wheat stitch into magic ring.
Issue 2: The head had to be completely re-engineered. It took me 2 days. Not sure why so long but when it finally clicked what the problem was with my redesign (extra scallops), it came together fairly quickly.
I don’t have the head tutorial ready to share, but, hopefully I will get it to you soon.
In the meantime, hopefully, my tips and suggestions will help you make a whole flock of these pretty lace crochet Christmas birds for yourself.


What string/yarn do you use for these?
Hi Meghan,
I believe I used size 10 or 20 crochet thread. This is one of the oldest and most trusted brands – Red Heart Crochet Thread
I am going to have to dig around and see if I can find my marked up version of this pattern. It doesn’t take a crazy amount of time to make and really has the wow factor.
How did you stiffen the bird? What product do you swear by?
I use different things depending on the project and the yarn color. I use a stiffening, glue-type stuff from Hobby Lobby when I’m doing white things like snowflakes. I use regular liquid laundry starch for most everything else.
Have you by chance written out the pattern? I am not good with the diagram patterns.
Thanks
Unfortunately, I didn’t. Wish I had.