 Bullion knots are perhaps only second to French knots in their usefulness for embroiderers.
They provide a spring-like texture that based on stitch length can be straight, curved or even used as a picot.
The name bullion stitch comes from it’s similarity in appearance to purl and bullion, wire coils of gold or silver made in a series of continuous rings. Bullion was often used on military uniforms, heraldic designs and in ecclesiastical work.
With the bullion stitch, the embroidery thread is used to create the coils and is appliqued to the piece all in one stitch.
How to Sew the Bullion Stitch
The bullion stitch is only complicated for the maintaining an even tension among the loops on your needle; let go at the wrong time and you’ll have a bit of tangled mess on your hands.
Bring the needle to the right side of the fabric and insert the needle about one-eighth of an inch away. Grasp the thread about 2 inches from the fabric and twist it several times around the point of the needle. (The more twists, the longer your stitched coil will be.)
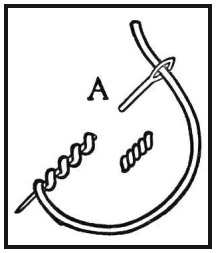
Use your thumb to keep the coils wrapped tightly around the needle, draw the needle and thread through the coils and then insert the needle back into the fabric at the point you started – A on the diagram. Do not remove your thumb from the coils until it gets in the way of pulling the stitch tight.
 If you make more coils than the stitch is long, you will create a slightly curved stitch like the one shown.
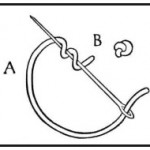
Make the stitch even tighter and you can use the bullion knot to create picots.  In the example shown on the right, a connector bar is being sewn using the buttonhole stitch. Work the bar to the point where you wish to make the picot. Insert the needle into the heading of the last stitch. Leaving the needle only partially through, twist the thread 6-8 time around the point of the needle. Use your thumb to keep the coils securely wrapped around your needle and pull the needle and thread through the coils tightly. When the coil doubles up into a loop, continue making making your connector.
This bullion stitch or bullion knot requires a bit of finesse and I would suggest some practice with waste canvas and yarn scraps before attempting this stitch on a finished piece.


I’m sure anyone doing applique would be interested in your demonstration. Its so much easier to understand with pictures. Thanks.
thank you for sharing written instructions. sometimes they are better than videos
You are most welcome. Drop me a line sometime. I would love to see what you are making with your bullion stitches.
finally. have tried this stitch and always ended up with a mess. no one mentioned keeping the tension. guess they assumed everyone knew that. so happy. now can add this stitch to my projects.
Yay! So glad my tutorial helped you.