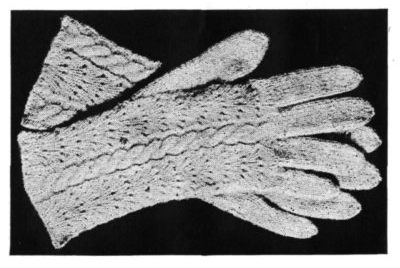
 This vintage knitting pattern to make a pair of fancy ladies gloves dates back to 1918.
Again, it might be a bit tricky determining the right yarn/needle combination but it seems like you could see how the main glove fits over your hand without having to invest too much time before testing. If I were making this knitting pattern, I would test by making a few of the fingers and perhaps the wrist to determine the appropriate gauge.
Please let me know if you give this vintage knitting pattern a try and how it turns out for you.
Free Vintage Knitting Pattern for Lady’s Gloves
Use No. 16 steel knitting needles, with Spanish knitting-yarn or worsted. Cast on 57 stitches.
1. Purl 2, slip and bind, (over, knit 1) 5 times, over, narrow, purl 2, knit 6; repeat twice.
2. Purl 2, knit 13, purl 2, knit 6; repeat.
3. Purl 2, slip and bind, knit 9, narrow, purl 2, knit 6; repeat.
4. Purl 2, slip and bind, knit 7, narrow, purl 2, knit 6; repeat.
5. Same as 4th row.
6. Purl 2, slip and bind, (over, knit 1) 5 times, over, narrow, purl 2, take 3 of the 6 stitches off on a separate needle, hold this at back of work, knit next 3 stitches, then knit the 3 on separate needle; repeat.
Continue in pattern, twisting the knitted “cable” as directed every 6th row, until the wrist is seven patterns in length. Then carry one cable up back of hand, with an openwork stripe each side, and knit plain across palm.
Commence thumb at top of wrist. As the knitted gloves are right and left, care must be taken in starting the thumb so that both will not be for the same hand. On the left-hand glove the thumb is started at right of the stripe, on the right-hand glove at the left of stripe. Begin thumb with widen, knit 1, widen; knit 3 rows as usual, then widen, knit 3, widen; continue in this way until you have widened the thumb to 17 stitches. Put these on 2 needles, on a 3d needle cast on 7 stitches, join and knit once around, in each of next 3 rounds narrow 1 of the 7 stitches, arrange the stitches evenly on 3 needles, knit two inches, then narrow at end of each needle until you have 6 remaining, put these on 2 needles and bind off.
Continuing with the hand, pick up the 7 stitches cast on at base of thumb, knit to the base of the little finger, and divide the stitches on 2 needles, or, if more convenient, take them off on a twine. For the little finger: Take 8 stitches from back needle and 8 from front, and cast on 6 stitches, knit once around plain, narrow off 1 of the 6 stitches in each of next 5 rounds, knit 2 inches, narrow 1 stitch at end of each needle until 6 stitches remain, put these on 2 needles and bind off.
Knitting the First Finger: Pick up the 6 stitches cast on for little finger, knit to the middle, take 8 stitches from each side next the thumb, cast on 6 stitches for inside of finger, knit once around plain, in next 4 rounds narrow off 1 of the 6 stitches, knit two and one-half inches, and finish off as before.
Knitting the Third Finger: Pick up the 6 stitches cast on for first finger, knit them, knit plain, leaving 9 stitches toward little finger, putting these on separate needle, 9 stitches from other side, cast on 6 stitches, knit until you get to those left for little finger, narrow 1 of these and 1 of the 6 each time around for 6 rounds, knit two and one-half inches, and finish off as directed.
Knitting the Middle Finger: Pick up the 6 from last finger, knit around plain, proceed as directed for third finger, knit two and three-fourths inches plain and finish off.
This vintage knitting pattern ended here. I suppose knitters are left to knit and size the pinky finger on their own. Hopefully, after making the other 3 fingers and thumb; this should not be a problem.
