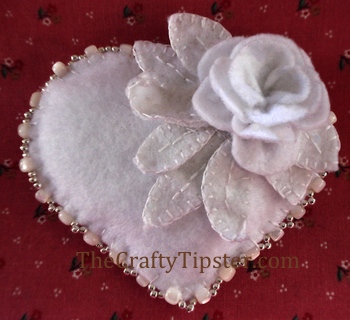
 You may recognize this heart pin from an earlier post – here. A major part of the design is the rose flower. Today I’m sharing how I made that rose.
This felt rose pattern is a simple project that requires very little felt. Don’t let the length of my instructions fool you, these are quick and easy to make.
They are made from circles. The smaller the circle, the smaller the flower. The number of petals varies. I made the white one using a one inch circle for the base and 12 half circles for the 12 petals. Depending upon how tightly you make the petals and attach them together, you may need more or less petals.
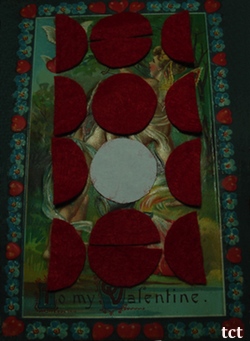 If you are short on time, cutting out 7 circles and then cutting 6 in half is the way to go. If you have a bit more time and are short on felt, fussy cut the half circles to make your felt go further. (Fussy cut is a quilting term generally used for cutting out fabric pieces to preserve something printed on the fabric. In this case, fussy cutting refers to placing the pattern pieces on the felt so as to have the least amount of waste – fussy cutting works better when using left-over scraps from other projects.)
Crafty Tipster Hint: Cut out the petals as you go. You may not end up needing the same amount from flower to flower.
It won’t matter if the circles aren’t perfect. Just make sure you have nice clean cuts along the outer curve of each petal.
There are two ways to approach this.
The first one is to sew each petal individually and then attach them together. Yeech, too much fussing for me.
I do a sew as you go approach; making the gathers in each petal and sewing them on at the same time. Use a thin, but somewhat long needle that won’t bend.
Crafty Tipster Hint: Since all of the stitches are hidden, I like using two strands of regular sewing thread, rather than using a more expensive thread.
Step-by-Step Felt Rose Pattern
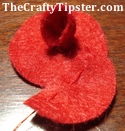
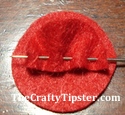 Put a knot in one end of the thread and take one of the half-circles and sew a running stitch along the flat-side, as shown. Starting the thread through the circle works too and seems a little less fiddly but I’m not sure the central petal gets gathered as tightly that way.
- Pull the stitches tightly to create gathers. Holding the gathers, insert needle near first stitch and pull tight.Tie a knot with the tail to ensure it stays gathered. Trim the tail but don’t worry about it too much as it will get covered up with other petals.
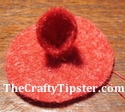 Sew the petal to the center of the circular base pattern piece. Try to curl the petal a bit as you attach the two pieces.This 1st petal will become the very center of your felt rose, so also try to stand it on edge as much as possible.
Take your time to get the shape you want; use as many stitches as you need to.
This petal is the most important one as it helps to shape all the petals that follow.
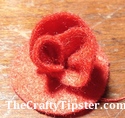
 The 2nd petal is going to go across the open side of the 1st. Bring the needle up through the circle around where the fold is on the first petal. Run a series of running stitches through the petal on the straight side.Pull to make the gathers and try to have the 2nd petal end around the fold on the other side of the first petal.
Stitch the 2nd petal down onto the circle and pull the thread snugly to maintain the gathers. Add a few small stitches, including along the gathers to tack the petal onto the circle. Again, this petal should be somewhat upright as it too is part of the center of your felt rose.
 From this point forward, you will be adding rose petals one at a time. You should place them where the previous petals overlap. Attach them the same way you did the first two. Be sure to tack down the ends of the straight sides, almost hiding them under the previous petals.
As you work out from the center, the petals should start laying down. By the time you get to the edge, they should be more relaxed and fairly flat. Don’t worry if they are not perfectly flat, the most important thing is to hide the base circle and create a pretty-looking felt rose.Don’t worry if the base circle starts to pucker, it won’t show when you attach the felt rose to your project.
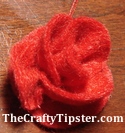 Continue working around the center of your rose, putting each new petal across a place where two earlier petals meet.
When all of the base circle is covered with petals, take a moment to position everything and make a few last stitches to tack it all in place.Each time I have made a flower from this felt rose pattern, I have used a different amount of petals.
Stop adding petals when the base circle is hidden and you like the shape of your flower.
Roses of All Sizes
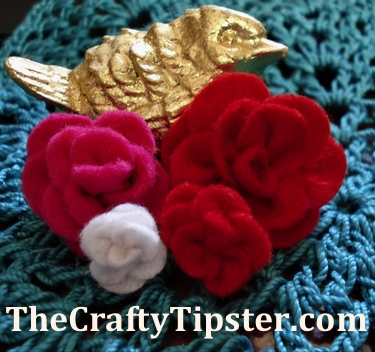 Part of the beauty of this pattern is that it works for just about any size circle and you could pretty much freehand them if you wanted to. The roses I’m showing with Goldie were made with a 1 inch circle, a ¾ inch circle and 2 ½ inch circles.
I found as you go smaller it’s a bit fussier to sew and you might not get consistently sized flowers from this felt rose pattern. The two smallest flowers started with the same size circle. The white felt is slightly thinner, so that may have impacted the size too.
In a future post, I’ll be sharing the rest of the pattern for my Valentine pin.
I think with the felt rose pattern in hand, the rest of the heart pin might be easy to follow from the photo.
The turquoise doily in the background is part of my next easy crochet doily pattern series. I can’t wait to share it with everyone, it just needs a bit more finishing.


