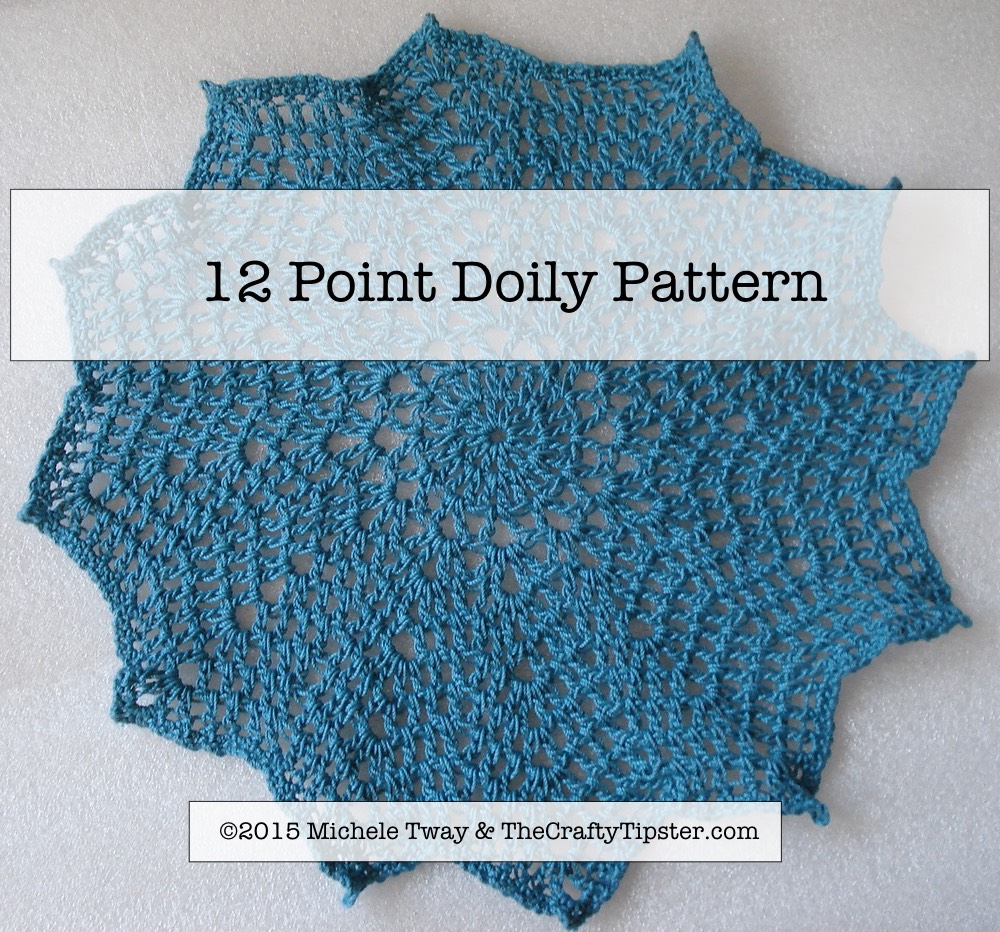
 I have crocheted 12 point doilies several times in the past and every time I find myself wasting so much time trying to figure out the stitches I need and where to put them. It’s a fairly simple pattern with a repeating group of stitches that are crocheted as you go around the piece. But, I think most 12 point doily patterns over-complicate the pattern.
So, I thought, perhaps it would be easier to break down the pattern for each row into a more descriptive tutorial; like the way I work out the stitch instructions in my head, instead of the standard pattern shorthand. So here goes my version of the round flower afghan….
The 12 point doily pattern uses only 3 types of stitches – double crochet (dc) – that’s the one with one loop over the hook, chain (ch) and slip stitch (sl-st). Stitches are made in the gaps between the double crochets, rather than through the two top loops of each stitch. That gives the doily a more open feel and makes it much easier to make.
All of the rounds generally start with a 3 stitch chain to mimic a double crochet and end with a slip stitch into the top of the chain 3 that you made at the start of the row. The rhythm of the pattern is that from round 4 on, you will be adding a triplet of stitches at the tip of each petal or point, in the chain 2 from the previous round. Starting with the 6th row, all even row triplets should be 1dc -ch2 – 1dc and odd row triplets will be 2dc – ch2 – 2dc.
12 Point Doily Pattern
Start with a magic ring of 12 dc. Join with a sl-st.
 Row 1: Crochet two dc in each gap between the stitches for a total of 24 dc.
Row 2: Sl st to first gap, chain 3, make one more dc in same place; then work 2 dc in each gap. Join with sl-st.
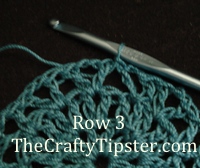
Row 3: slip stitch to first gap, ch 3, * skip next stitch, crochet a 1 dc – ch 2 – 1 dc triplet in same stitch (you’ll be making the triplet in between the pairs of double crochet from row 2) * before joining the round, do 1 dc in the same place you made the ch 3 to start the row, ch 2 and then join (placing the slip stitch to join in the space between the ch 3 and the first dc, rather than at the top of the ch 3, will make the round look nicer).
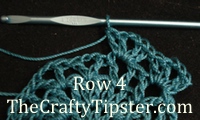 Row 4: sl st over to the first ch 2 gap, ch 3 – 1dc – ch 2 – 2dc in the first ch 2 gap, continue working around crocheting 2 dc – ch 2 – 2 dc in each ch 2 gap from the previous row. join.
Row 5: At this point, you should have 2 double crochet surrounding each ch 2 gap. This row is worked by putting a double crochet in between each pair of double crochets and the 2dc – ch 2 – 2dc triplet into the chain 2 gaps (you’ll be skipping over the triangular gap where the triplets from the previous row attach to each other).
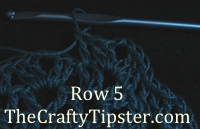 Start by slip stitching to the middle of the first pair of dc, chain 3, 2dc – ch 2 – 2dc triplet in the ch 2 space, dc in between second pair of dc from previous row to make the first petal. Continue working around the piece by making a dc, triplet, dc series on each petal. Join with sl st.
Row 6: You should have 3 dc on each side of each 2ch peak. You should start seeing a pattern and rhythm to how each row is worked. dc in between each of the dc (2 dc before and after the triplet), skipping the triangular gap. This even row is where you’ll start alternating the triplet – make even row triplets with 1dc – 2ch – 1dc. Again, start the row with 1 sl st and ch 3 (sound familiar yet?) and join with a sl st.
Row 7: Row 6 didn’t add any stitches. So you still should have 3dc on each side of the 2ch peaks. Row 7 is done the same way as row 6, except for the triplets – this time they should be 2dc – ch2 – 2dc as they will for each odd row that follows.
Row 8: There should be 4dc on each side of the 2ch peak; 1 dc in between each of the 4dc on each side of the peak. This is an even row, so the triplets should be 1dc – 2ch – 1dc.
Row 9: Odd row…triplet 2dc – ch2 – 2dc, yielding 5 dc on each side of ch 2 peak.
At this point, just keep working your odd and even rows. The more rows you crochet, the more defined the points will become.
I would recommend laying out your doily every now and again. Flatten it with your hands to get the threads to relax and lay flat on the table. If you find your doily is developing a bit of a ruffle, remove the rows that won’t lay flat and alternate the triplets less often for the next few rounds; meaning do 2 rows with a 1dc – ch 2 – 1 dc triplet for every one row with a 2dc – 2ch – 2dc triplet until the your doily starts laying flatter. Once your doily is laying nice and flat again, return to alternating the triplet pattern from row to row.
I had a single ball of Coats Crochet Aunt Lydia’s Fashion Crochet, Cotton Size 3, Warm Teal. The size of my 12 point doily was limited to what I could do with 150 yards of the beautiful dark turquoise thread.You could easily make your doily larger or smaller or even with a different type of yarn or crochet thread.
Coats recommends using a size E hook. However, I used a size H crochet hook to create a more lacy appearance. If you don’t have these hooks or would like to pick up a few spares, I recommend the Boye Aluminum Crochet Hook Set, Sizes D-K. Yyou’ll get a set of 8 hooks for around what you would pay for 2 or 3 if you purchased them separately.
How you finish the 12 point doily pattern is really a matter of taste. You could simply leave the last row as the edge. Or you could do something like this picot crochet edge or weave a finished edge. To finish my doily I wove a finished edge. It took several hours but I think it makes for a nice, professional look. Just don’t pull the thread too tight or you’ll make your petals pucker.


