What started out as a bit of a lark; making paper mache hearts for Valentine’s Day; turned into an almost week-long project. Worse yet, it was a project that almost remained lost forever in my Drafts folder. Part 1, you see, was written three years ago and never posted. That might have proved to be a good thing; but, we’ll get to that in a moment.
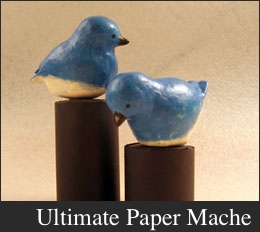 I’ve wanted to try making cute little birds from Joni’s paper mache bluebirds tutorial for years – shucks, even more years than it’s taken to actually post this post.
I’m more of a needle and thread sort of crafter. My preferred tools are crochet hooks, sewing needles and felting needles. But, there’s something about the building up of layers of paper drenched in goo and turning it into something sculptural that fascinates me.
I thought a smaller project might be less daunting than Joni’s bluebirds, so, I opted for hearts. And, well, I wanted to make something for Valentine’s Day.
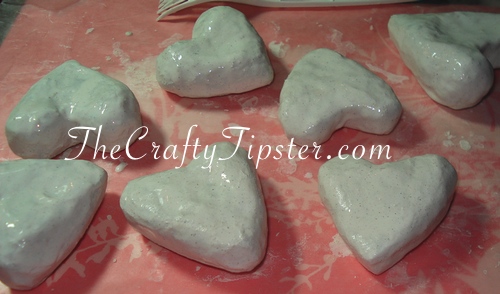
Part one of paper mache hearts ended with my still-wet hearts drying near our heat register.
Sanding Paper Mache
Every time I pick up my hearts, all I want to do is sand them some more. While I can get a fairly smooth to the touch finish, I’m left with a lot of hills and valleys that don’t even out. They’re clearly visible in the photo.
When I first made the hearts, I even tried to add more paper mache and extra thick paste to fill in some of the deeper valleys. It worked somewhat, but it would have taken more time and effort than I was willing to expend to getting them smoother.
Getting a Nice Surface
Were I to make a paper mache project again, I would take more time making the underlying form. The hills and valleys were there from the masking tape stage. Had I wrapped the heart with more tape or tried to add some sort of material into the valleys, I’m sure I would have been happier with the results.
The Skin Coat
 If you remember in my first post, I didn’t have the wood glue recommended by Joni. She suggested adding glue and paint to the paper mache mixture to create a skin coat. She mentioned using carpenter’s or wood glue and suggested white school glue might work too.
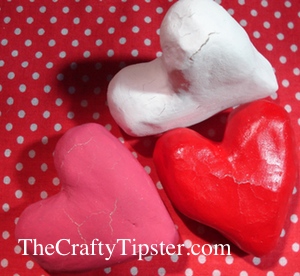
Well, I didn’t have any wood glue at the time. I tried the school glue. It worked when I made my hearts. But, now, three years later, a number of my hearts have cracks on the surface – some little ones, some not-so-little ones. So, if these are a project you plan on keeping for years, do invest in the wood glue; it’s clearly worth it.
If you plan on making paper mache hearts or little birds from Joni’s tutorial, get some wood glue from your local hardware store, WalMart or with your next Amazon order. Clearly, school glue is not a viable substitution. A fellow in the painting department in our local Home Depot recommended this particular glue for another crafting project I was working on. I asked him for that middle of the road, not too cheap and not too crazy expensive without any truly beneficial qualities the for the extra price product. Without hesitation he said to get the Titebond rather than Elmer’s or Gorilla brands (the other less expensive options) of wood glue.
Painting My Hearts
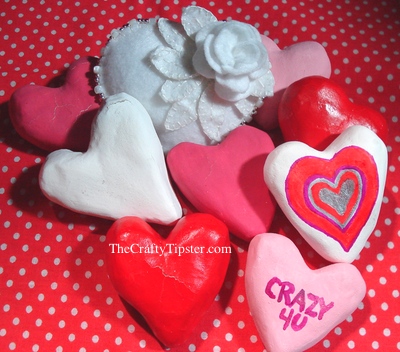
Seeing as this was a Valentine’s Day project, I painted my hearts red, dark pink, light pink and white. I used those little bottles of acrylic paints you can generally get for around a dollar. One of the paints, the red one, was a multi-surface formula that gave a more varnished-looking finish. It cost a little more but the finish makes it worth it. The other three colors dried with a more matte surface and seem somehow less finished than the red ones.
Once painted, I found I could doodle on them or turn them into Sweety style message hearts – though my calligraphy skills could use a bit of practice. Markers worked great. I used a silver Sharpie along with a middle-of-the road brand and one of those really cheap ones – the 40 pens for $5 sort of thin markers. Colored pencils only left light smudgy colors on the rough surface.
Paper Mache Hearts for Valentines Day
Clearly, making anything out of paper mache is not a last minute, night before sort of craft. It can take days for the forms to harden and the paint to dry. That said, it was fun. I enjoyed it and I suspect were I to give it another go, the end product would look better. I still want to make a bird or two like Joni’s.
But, if I just wanted to make some paper mache hearts, I would probably buy some pre-made hearts, like the ones from Amazon below, and then paint and decorate those. By using pre-made hearts, you’ll still enjoy all of the homemade goodness your creativity can bring whilst ensuring you have a nice, professionally smooth base to start with. Not to mention pre-made paper mache hearts will save time and you’ll not have to worry about them drying fast enough or cracking.
[amazon_auto_links asin=”B0BFJCSXLN”]
Another option would be to get some paper mache heart trinket boxes. Perfect for adding a special little gift or storing tiny treasures.
[amazon_auto_links asin=”B00KHASMRQ”]


