Adventures in Punch Needle Embroidery – Part II
In an earlier post (Punch Needle Embroidery), I mentioned an impulse purchase of a Dimensions Punch Needle Kit at our local 100 pennies store. I had thought the kit came with the punch. So, I thought even if the kit was missing something, it was in a discount store after all, I would have the punch and the thread – and surely they were worth more than 100 pennies.
Turns out the kit didn’t include a needle after all. I purchased Dimensions Needlecrafts Punch Needle, Tool and Threaders since the kit had a picture of someone using that punch needle.
Their needle was among the less expensive ones on Amazon and I assumed it would be the right size for the fabric. The only big issues with the needle is the included threaders are a little short and the instructions said to use three strands of thread which turned out to be one strand too many. I would recommend it. You can always invest in one of the fancier needles once you decide whether or not you like needle punching.
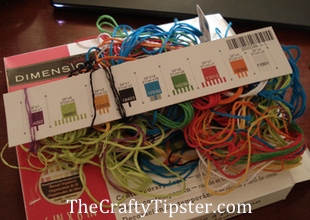 Speaking of thread… I hate those embroidery kits that come with so little thread that you find yourself having to safe every last inch to make sure you have enough. With this kit, Dimensions went a bit overboard. I’ve completed my kit, with somewhat messy stitches (meaning using more thread than a pro would use) and I have more than enough to make another matching embroidery with the same pattern. Think I’m exaggerating…check out the photo.
Their kit also came with a thread organizer. It sandwiched the threads in between two pieces of cardboard with a label. The only way it seemed to get the thread out of the organizer was to cut it. Hated wasting the thread, but the piece does not open. What might of been a good idea turned into a bit of a tangled mess. Each pre-cut strand hangs down from the organizer. Before I even started, the threads were already tangled but it did save time in the long run.
 I’ve done more than a little embroidery but would not consider myself expert by any means. Punch needle felt more like doing paint by number than embroidery. The idea is to fill in the colors. It doesn’t have the variety of stitches that typical needle embroidery has. But, that’s not to say I didn’t enjoy doing it. It’s a great TV craft – no counting! And, there is something kinda soothing about the little popping noises it makes as the needle pokes through the fabric.
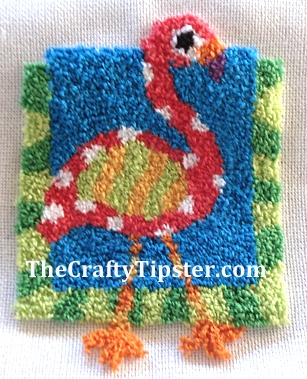
This flamingo design is the work of Jennifer Johnson Haywood. She has illustrated a number of children’s books and she often uses happy and bright colors in creating her animals.
Had I created this punch needle flamingo from scratch, I doubt I would have made a polka dot body or striped legs. I love the way they turned out. I wasn’t sure about leaving the frame open on the top, but I like the way that looks too.
As a first attempt at punch needling, I think it turned out pretty well. The legs are a little wonky and the feet were a bit fussy. I definitely need more practice at small circles. I worried too much about not having gaps between colors and here and there the loops intermingle at the color changes.
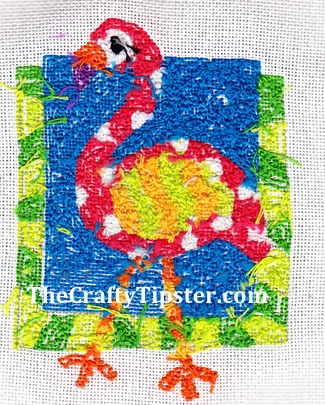 The instructions on the kit recommended outlining each section and then filling it in. The sections where I did this were easier to complete and I had more control where colors met each other. I figured out near the end that if I left a row of the weft of the fabric unstitched where colors met and heavily filled the areas, I had fewer stitches that bled into other areas.
The expert punch needlers have the technique down far better than I do. The backs of their pieces look almost like a needlepoint. Mine is a mess. There are patches here and there where I did it like the pros but, as you can see, overall, mine’s not even close.
Dimensions Needle Punch Kits
While I think needle punching is far from a lost art, apparently Simplicity (the parent company of Dimensions) thinks it is. I found only one punch needle kit on their website.
You can still find older kits on Amazon and elsewhere, but, I wouldn’t wait too long as it appears once they are gone, they’re won’t be any more.
Here’s some I found on Amazon…
Before picking out a needle punch kit from Dimensions or anyone else, check the project carefully. Several of the Dimensions needle punch kits required French knots and other hand-stitching. I think it makes them look even more interesting and dimensional. But, if you are not an embroiderer or unwilling to learn a few stitches; you should pick a kit without embroidery.
I found a number of the reviews for these products to be very unfair. A lot of the negative reviews were made by folks who simply couldn’t figure out how to do needle punching. I admit the instructions in my kit were poorly done. But, the kit itself provided plenty of materials, had a cute design and if you need instruction, you can visit my post with tips on punch needle embroidery or visit YouTube like I did.


Love this flamingo. Looks like a neat project to do with my grandchildren. Really like the happy colors. Can’t wait to see the real thing in Disney World this spring. Though, I don’t think they will have white polka dots.
Hi Winnie!
Thanks for the comment. I like the colors too. They weren’t ones I would have put together but I love the way it turned out.
Disney in the spring? Smaller crowds, cooler weather…the perfect time to go. Have fun.
Thank you for helping me learn more about punch needling. You mentioned that the kit said to outline each section and then fill it in. It seems important to maybe have a basic, simple design first so you know exactly where the colors will go.
I wonder, how do the techniques of using thinner yarns compare to those which use thicker ones like you do? Thanks for dropping by.