 It’s been way too long since I’ve posted a spool knitting project on The Crafty Tipster. This spool knitted soap cover has been in the back of my mind for months and I’ve finally sat down and actually made it up. Don’t let my procrastination fool you, this project is super quick makes a great project for the entire family.
For this project, I used some Red Heart ombre yarn I had in my stash. To ensure the spool knit fabric will work well as a washcloth, I used an acrylic yarn to provide a bit of scratchiness.
 I lucked into a semi-complete set of Knifty Knitters at a yard sale and used the blue spool knitting loom for this project. It measures 5.5 inches across and has 24 pegs. I used all of the pegs.
In case you’ve forgotten how to spool knit, check out my spool knitting tutorial for a refresher course.
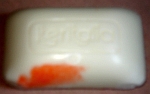 One of the Christmas presents that I gave Mom this year was a bar of luscious-smelling Italian soap. I purchased it at a discount store not realizing that the flowered label had somehow dyed a section of the soap orange. Not a real biggie but since the soap smells so nice, Mom’s been keeping it on a closet shelf.
Whether you have a bar of soap that might need a bit of glamming up or you just like the way a covered bar of soap feels in the shower (they’re great for little hands too, not so slippery), this spool knitted soap cover will turn your bar of soap from bland to glam.
OK, ready for the spool knitting tutorial? Here it is…it couldn’t be simpler. You might even wonder why you didn’t think of it first.
Using the Knifty Knitter or a similarly-sized knitting loom, spool knit 10-12 rows of knitted fabric. Remove from the loom following the instructions on the learn how to spool knit tutorial.

If you don’t already have one of these weaving looms, Amazon has Darice 1171-58 Set of 4 Round Plastic Knitting Looms for under $20. It even comes with a plastic yarn needle and a loom pick (to lift the yarn off of the pegs).
Update…My apologies to Kay and her daughter and anyone else who may have been trying to figure out my tutorial for a spool knitted soap cover. I didn’t include many details on how to close the one end of the pouch. I will be adding pictures once my camera battery gets recharged but for now, hopefully, my instructions will be clear enough you won’t need them anyway.
 Look at the top of the last row of stitches. You should see two loops for every spool knit stitch. We’re going to work with the outside loops only.
Using a separate piece of yarn, you’re going to thread/weave the yarn in and out of each of the outside loops – make sure you cut it long enough to go all the way around loosely. It doesn’t matter how you start, just go from the outside in on one stitch and from the inside out on the next. I used a contrasting color to make it easier for you to see.
You would probably want to use the same color you spool knitted with.
 Work your way around all of the spool knit stitches. When you come back to the beginning make sure the end of the yarn is in the same gap as the where you started as shown in the photo. Pull the yarn tight to gather all of the stitches and tie the ends like you would close a draw-string bag. Trim the ends and tuck them into your pouch.
If you would prefer a felted soap cover, simply use wool yarn. After a few uses, the yarn should felt from your scrub-a-dub-dubbing, the heat of your bath or shower water and the soap itself.
Keep in mind, depending upon the size of the soap you are wrapping, you might want to use a smaller knitting loom and/or make a different number of rows.


This is a great idea, thanks. My daughter just finished her first one for Christmas presents, but we do have one question. We finished the end of the correctly so that it formed a pouch, and put the soap in, but I don’t understand how to finish the other end. If I pull of the yarn, it does not tighten the end, but I think we started in correctly. Any ideas? Thanks.
Hi Kay,
Oh I am so glad that your daughter likes this project. Looking over the tutorial again, I think I left a little bit out…I am so sorry about that.I know how much it stinks when craft tutorials don’t work out right.
The end has to be sewn shut by weaving the yarn into the stitches and pulling it snug – think of how a drawstring bag works.
Right now my camera battery is charging. Hopefully, in an hour or two, I’ll have the revised instructions ready for you.
Warmest Regards,
Michele
Finally, camera charged, photos taken, post updated.
Thanks again Kay for letting me know that I dropped the ball a bit on this one. I probably never would have caught my error otherwise.