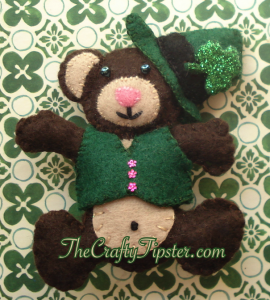
I had originally thought that I would create a Leprechaun feltie to share with you for St. Patrick’s Day. I’m not sure when it happened, but, I found myself creating a little bear with a vest and hat with a glittery shamrock instead. I think he came out super cute and I thought I would share him with everyone, including a pattern and some tips and hints.
Supplies Needed for St. Patrick’s Day Bear
- Green felt
- Dark colored felt for bear body and head
- Lighter colored felt for bear belly and snout
- Tiny scrap of pink felt
- Scrap of black felt
- Small amount of fiber fill or teeny felt scraps for stuffing
- Beads for eyes
- Buttons
- Green glitter
- Pin back
Vest Buttons
I only had 6mm buttons and thought they were too big – and why oh why do they make them so darn thick too?

I dug out my sequins and glitter and thought one of those clever multi-use items was perfect. My little pink flower buttons are actually 2mm nail embellishments – as in, embellishments to use with manicures.
Mine came from a local 100 pennies store. The packaging makes them super easy to store and keeps them quite tidy. It has a nice variety and I can’t wait to use those pretty little fimo flowers on a project.
If your 100 pennies store doesn’t have anything like this or you just want a bigger selection (our store generally has only one or two to pick from at any given time), you really should check out Amazon.com.
There’s tons and tons of different little embellishments being sold as nail art. Many of them look like they would be absolutely perfect for tiny sewn items. And, it seems like the prices for the teeny nail embellishments are often better than those for items being marketed in the crafts section.
Fine Glitter
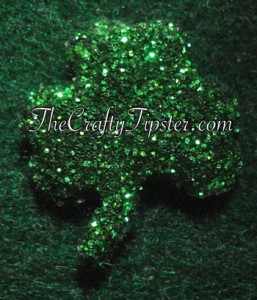
I glued super fine green glitter on the shamrock.
I laid the felt shamrock on a bit of waxed paper, spread a layer of tacky glue all over it and then sprinkled the fine glitter over it. I left it to dry for several hours and then did another layer.
I thought it would be a great idea to put a top layer of glue on the glitter to keep it from shedding. It works to keep the glitter in place but it also ruined the glittery-ness. I ended up putting another layer of glitter on top of my failed “finish layer” for a total of four layers of glitter. An added bonus is that it stiffened the felt which should help keep the stem from unraveling.
With such a small item, using a super fine glitter like Horizon Group Assorted Fine Glitter should provide the best results. Regular kids glitter will work but it will look a bit chunky.
Embroidery Stitches Used
The bear’s belly button is made with a French knot. If that stitch is new to you, we have a French knot stitch tutorial that might help. I had run out of black embroidery floss – a good substitute is to use three strands of black sewing thread and double them (allows for only three strands through the eye if the needle but six strands to embroider with).
The remainder of the embroidery is a simple blanket stitch used as an edge. Check out our blanket stitch tutorial. (Some folks call this stitch a buttonhole stitch, but, technically the stitch is a blanket stitch.)
The nose and inner ear pieces were so small that I just used a regular straight stitch to attach them.
St. Patrick’s Day Bear Pattern
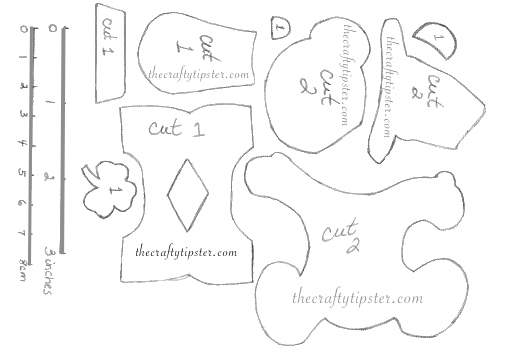
I just sketched this pattern and rather than waste more time (I tried, I really tried) on making it look like a store-bought pattern with nice sharp lines, I’ve included a scan of my pieces. I’ve included a sizing guide in both inches and centimeters to help you keep from making the pattern pieces too big or too small.
It makes it easier to hide the threads and knots by embroidering the snout, face, belly and inner ear pieces in place before assembling the bear. I attached the hat band after I put the hat together.
The vest is not actually sewn to the bear. To make it look more finished, I ran blanket stitch along the neck opening and where the arms go. I draped the vest over the bear and sewed the seam on one side and then took the vest back off. I then did a blanket stitch along the bottom (you can do it on the bear but it’s harder.) After covering the neck, sleeves and bottom of the vest with blanket stitch; I put the vest back on the bear and closed the second side with blanket stitching.
Leave the hat open at the bottom to slide it down over the bear’s head. Be sure to angle it low enough to cover where the ear would be; otherwise it looks like the bear is missing his ear.

I do hope you let me know what you think of my St. Patrick’s Day Bear pattern.


