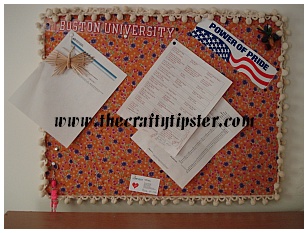
This project can be as unique as you want it to be! I made my recycled note board super fun and very girly.
 It was inspired by our latest appliance purchase. It seemed there had to be something cool we could make out of that giant cardboard box while keeping it out of the local landfill. Then I remembered I had this pretty, but somewhat loud, fabric in my stash that I had purchased on a whim without having a plan for it.
The perfect combination, I had everything I needed already in our home and I could make something useful from it.
This project should be made as a family or by older children as it involves using box cutters or other sharp cutters and staples.
Supplies Needed:
Corrugated cardboard pieces
Glue (white school glue)
Large piece of fabric
Standard size stapler
Box cutter or razor cutter
Pom-Pom or otherTrim (optional)
How to Make a Recycled Note Board
Find several nice-sized pieces of corrugated cardboard – that’s the kind used for boxes that has the wavy stuff in the middle.
If using used boxes, open them up to create a single flat piece of cardboard.
What we are going to do is to stack several pieces (2-4) of cardboard on top of each other to create our board. Keeping that in mind, collect several pieces of cardboard that are the same size and shape. You can use a piece that includes a folded part of the box, but don’t stack the folds on top of each other otherwise you will have an uneven board.
Your recycled note board will be sturdier if you use side panels of similarly sized boxes that do not contain folds.
Cut each of the pieces to the same size – this part may be best done by an older member of the family. Perfection isn’t needed, but try to make it close. (I made a simple rectangle, with a bit of patience just about any shape would work.)
Put the printed sides together and tack them together using a light layer of glue in the center and edges. The idea is to hold the pieces in place to make putting your board together easier. Too much glue might interfere with your ability to put tacks into your board.
Measure the height of your board against an new, unused and unbent staple. If the staple is taller than your cardboard stack, continue adding pieces of cardboard until your stack is taller.
Take a piece of fabric large enough to cover the front of your board and have 4-5 inches extending beyond the edges. Lay your stacked cardboard pieces on the back-side of the fabric. Center the board on the fabric. Be mindful of the pattern of the fabric when placing the board on top.
On the two shortest ends of your board, wrap the fabric around the edge and onto the back side. Staple about 1 to 2 inches from the edge of the board to secure the fabric. After stapling the two short sides, repeat the process with the long sides. The goal is to keep the fabric taught so as not to have gaps on the front side.
I had a giant piece of pom-pom trim in my stash for years that I added to my board – just because I wanted to and to help hide the back of the board when viewed from the side. You can do something similar, frame your board using a store-bought frame or make your own rough frame – perhaps fashion a frame from stacks of cardboard to complete the recycled theme.
Use the thinnest nails you have to tack your board to the wall. I simply drove the nails right through the entire board. My board gets light use. For a board with heavier use, you may need larger or more nails than I used.
If your recycled note board ever wears out or the tacks stop staying in, simply pull the staples out and replace your cardboard.
Best of all, if you ever get tired of your recycled message board, you can take it apart and salvage the fabric and any trim you used for another craft or sewing project.
Wall Decoration
Have a piece of fabric or other textile that could make an interesting piece of wall art? Why not use this same technique to create a light-weight, decorative wall hanging?


